
Die Macht des Blickkontakts in Fotografie und Marketing
In der Fotografie und im Marketing kann ein fesselnder Blick den entscheidenden Unterschied machen. Augenkontakt ist ein wirksames Mittel, um eine Verbindung zum Betrachter herzustellen, Emotionen zu vermitteln und die Wahrnehmung zu beeinflussen. Ob es sich um eine Produktwerbung, einen Social-Media-Beitrag oder ein persönliches Porträt handelt, die Blickrichtung eines Motivs kann die Botschaft und Wirksamkeit des Bildes erheblich beeinflussen. Jetzt können Sie ein Tool verwenden, das aus KI besteht, um die Augenrichtung im Foto zu ändern Technologie, um die Augen nach Ihren Wünschen zu manipulieren.
Die Herausforderungen bei der Erfassung der gewünschten Blickrichtung
Die Aufnahme von Fotos mit genau der gewünschten Blickrichtung kann aufgrund verschiedener Faktoren eine Herausforderung darstellen. Motive können von Natur aus in verschiedene Richtungen blicken, die Lichtverhältnisse können die Klarheit der Augen beeinträchtigen, und herkömmliche Fotobearbeitungsmethoden können zeitaufwändig sein und führen oft zu nicht optimalen Ergebnissen.
AI Änderung der Blickrichtungsmanipulation: Eine revolutionäre Lösung
Glücklicherweise haben die Fortschritte in der künstlichen Intelligenz (KI) eine Lösung für diese Herausforderungen gebracht. KI-Tools zur Änderung der Blickrichtung bieten eine bequeme und effektive Möglichkeit, die Blickrichtung eines Motivs zu ändern, sodass Fotografen und Marketingfachleute die gewünschte visuelle Wirkung erzielen können.
Diese Werkzeuge nutzen hochentwickelte Algorithmen zur Analyse von Gesichtszügen und zur genauen Anpassung der Augenposition, um einen natürlichen und nahtlosen Übergang zu gewährleisten. Durch den Einsatz von KI-Technologie können Sie die Grenzen herkömmlicher Fotobearbeitungsmethoden überwinden und wirkungsvollere und ansprechendere Bilder erstellen.

Verstehen der AI-Änderung Blickrichtungsmanipulation
Wie AI funktioniert
KI-Tools zur Änderung der Blickrichtung nutzen fortschrittliche Algorithmen und maschinelle Lernverfahren zur Analyse von Gesichtsmerkmalen, einschließlich der Augen, Augenlider und der umliegenden Bereiche. Diese Algorithmen können Schlüsselpunkte und Beziehungen zwischen diesen Merkmalen identifizieren, sodass das Tool die aktuelle Augenrichtung genau bestimmen und die notwendigen Anpassungen vornehmen kann. Werfen Sie einen Blick auf unseren Leitfaden zu Augen in der Foto-App öffnen.
Vorteile des Einsatzes von AI
- Genauigkeit und Präzision: KI-Werkzeuge zur Änderung der Blickrichtung können Gesichtszüge genau analysieren und manipulieren und sorgen so für natürlich wirkende Ergebnisse.
- Natürlich aussehende Ergebnisse: KI-Algorithmen werden anhand großer Datensätze mit menschlichen Gesichtern trainiert, so dass sie realistische und glaubwürdige Augenbewegungen erzeugen können.
- Zeitersparnis: AI-Werkzeuge zur Änderung der Blickrichtung können den Prozess der Blickrichtungsmanipulation automatisieren und so im Vergleich zu manuellen Bearbeitungstechniken Zeit sparen.
- Konsistenz: KI kann dazu beitragen, die Konsistenz bei der Bearbeitung von Augen in verschiedenen Bildern zu wahren und so einen kohärenten visuellen Stil zu gewährleisten.
Vergleich mit traditionellen Methoden
Herkömmliche Methoden zur Änderung der Blickrichtung beinhalten häufig manuelle Anpassungen mit Hilfe von Fotobearbeitungssoftware. Diese Methoden können zeitaufwändig sein, erfordern ein hohes Maß an Geschicklichkeit und können zu unnatürlichen oder verzerrten Erscheinungsbildern führen.
KI-Tools zur Änderung der Blickrichtung bieten dagegen einen effizienteren und genaueren Ansatz. Sie können die Gesichtszüge automatisch analysieren und entsprechende Anpassungen vornehmen, um einen natürlichen und nahtlosen Übergang zu gewährleisten.
Beliebte AI-Werkzeuge zum Ändern der Blickrichtung für die Manipulation
Prüfen und vergleichen
- Wesentliche Merkmale: Spezialisiertes Werkzeug zur Änderung von Gesichtsausdrücken, einschließlich der Blickrichtung.
- Vorteile: Einfach zu bedienen, Schwerpunkt auf Gesichtsmanipulation, erschwingliche Preise.
- Nachteile: Kann im Vergleich zu umfassenderen Fotobearbeitungsprogrammen eingeschränkte Funktionen aufweisen.

- Wesentliche Merkmale: Umfassende Fotobearbeitungsfunktionen, einschließlich fortschrittlicher Werkzeuge zur Bearbeitung von Gesichtszügen.
- Vorteile: Leistungsstark und vielseitig, in hohem Maße anpassbar.
- Nachteile: Kann für Anfänger komplex sein und eine steile Lernkurve erfordern.
- Wesentliche Merkmale: Spezielles AI-Fotobearbeitungstool mit Funktionen zur Manipulation von Gesichtszügen.
- Vorteile: Benutzerfreundliche Oberfläche, leistungsstarke KI-Algorithmen.
- Nachteile: Hat Einschränkungen im Vergleich zu vollwertiger Software wie Photoshop und EraseID.
4. Ändern Sie die Blickrichtung im Foto mit Topaz Adjust
- Wesentliche Merkmale: KI-gestütztes Fotobearbeitungstool mit Funktionen zur Verbesserung verschiedener Aspekte von Bildern, einschließlich Gesichtszügen.
- Vorteile: Fortschrittliche AI-Algorithmen, hervorragende Ergebnisse.
- Nachteile: Hat eine steilere Lernkurve im Vergleich zu den oben genannten Tools.
Fallstudien
1. Beispiel 1

2. Beispiel 2

Das Beste vom Ganzen:
Zwar bieten alle genannten Tools eine wirksame Manipulation der AI-Änderung der Blickrichtung, EraseID hebt sich als eine besonders beeindruckende Option hervor. Die benutzerfreundliche Oberfläche, die Konzentration auf Gesichtsausdrücke und der erschwingliche Preis machen es zu einer ausgezeichneten Wahl für Benutzer, die ihre Fotos mit Leichtigkeit und Präzision verbessern möchten. EraseID ist seit der beste KI-Lächel-Generator im Jahr 2024.
Schritt-für-Schritt-Anleitung: AI zum Ändern der Blickrichtung verwenden
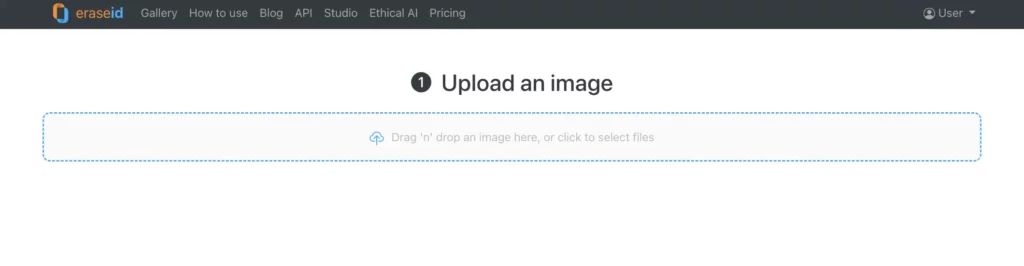
Wählen Sie ein Werkzeug : EraseID
In diesem Leitfaden konzentrieren wir uns auf EraseIDEraseID ist ein leistungsstarkes KI-Tool zur Änderung der Blickrichtung, das speziell für die Änderung von Gesichtsausdrücken, einschließlich der Blickrichtung, entwickelt wurde. EraseID bietet eine benutzerfreundliche Oberfläche, genaue Ergebnisse und eine Reihe von Anpassungsoptionen.
Bild hochladen
- Öffnen Sie EraseID: Starten Sie die EraseID Software oder den Zugang zur Online-Plattform.
- Bild hochladen: Klicken Sie auf den "Bild hochladen" und wählen Sie das Foto aus, das Sie bearbeiten möchten. Achten Sie darauf, dass das Bild von hoher Qualität ist, um optimale Ergebnisse zu erzielen.
- Wählen Sie "Ausdruck ändern": Nach dem Hochladen des Bildes werden Sie aufgefordert, zwischen "Identität löschen" zu wählen." und "Ausdruck ändern". Klicken Sie auf das Feld "Ausdruck ändernIn diesem Fall ist die Schaltfläche ".
Blickrichtung anpassen
- Suchen Sie die Eingabeaufforderung: Suchen Sie nach der Eingabeaufforderung, die speziell auf Ihre Anforderungen zugeschnitten ist. Sie ist mit "" gekennzeichnet.Blick".
- Wählen Sie die Richtung: Wählen Sie zwischen "links" und "rechts", damit die Augen ihre Position und Richtung anpassen können.

Vorschau und Download
- Vorschau Ergebnisse: Verwenden Sie die Vorschaufunktion, um die Änderungen an der Blickrichtung zu visualisieren.
- Anpassungen vornehmen: Verfeinern Sie bei Bedarf die Einstellungen, bis Sie mit dem Ergebnis zufrieden sind.
- Bild herunterladen: Wenn Sie mit dem bearbeiteten Bild zufrieden sind, laden Sie es in Ihrem bevorzugten Format herunter.
Wenn Sie diese Schritte befolgen und mit den Funktionen von EraseID experimentieren, können Sie die Blickrichtung in Ihren Fotos effektiv ändern und wirkungsvollere Bilder erstellen.

Ändern der Blickrichtung in Adobe Photoshop:
1. Öffnen Sie Ihr Bild: Öffnen Sie zunächst das Bild, das Sie bearbeiten möchten, in Adobe Photoshop.
2. Duplizieren Sie die Ebene: Erstellen Sie eine Duplikatebene Ihres Bildes, indem Sie auf Strg+J (Windows) oder Befehl+J (Mac). Dadurch bleibt das Originalbild erhalten, während Sie auf der duplizierten Ebene Änderungen vornehmen können.
3. Wählen Sie die Augen: Verwenden Sie die Lasso-Werkzeug oder Stift-Werkzeug um die Augen sorgfältig auszuwählen. Wenn die Augen geschlossen oder teilweise geschlossen sind, müssen Sie möglicherweise eine Kombination von Werkzeugen und Techniken verwenden, um eine präzise Auswahl zu treffen.
4. Filter verflüssigen: Gehe zu Filter > Verflüssigen. Dadurch wird das Verflüssigen-Werkzeug geöffnet, mit dem Sie Elemente in einem Bild verzerren und verzerrt darstellen können.
5. Stellen Sie die Augen ein: Verwenden Sie die Aufblähung und Kneifen Werkzeuge, um die Form und Größe der Augen anzupassen. Bewegen Sie die Werkzeuge vorsichtig um die Augen herum, um die gewünschte Richtung zu erreichen. Achten Sie darauf, die natürlichen Proportionen beizubehalten und eine übermäßige Verzerrung zu vermeiden.
6. Verfeinern Sie die Ränder: Verwenden Sie die Bürste Werkzeug, um die Ränder des verflüssigten Bereichs zu verfeinern und ihn nahtlos mit dem Rest des Bildes zu verbinden.
7. Beleuchtung und Schatten anpassen: Passen Sie bei Bedarf die Beleuchtung und die Schatten um die Augen herum an, um ein natürliches Aussehen zu gewährleisten. Sie können Werkzeuge verwenden wie Dodge und Verbrennung um bestimmte Bereiche abzudunkeln oder aufzuhellen.
8. Vorschau und Speichern: Zeigen Sie Ihre Änderungen in der Vorschau an und nehmen Sie die erforderlichen Anpassungen vor. Wenn Sie zufrieden sind, speichern Sie das bearbeitete Bild.
Zusätzliche Tipps:
- Beginnen Sie mit subtilen Veränderungen: Oft ist es besser, mit kleinen Anpassungen zu beginnen und die Intensität bei Bedarf schrittweise zu erhöhen.
- Verwenden Sie ein Referenzbild: Wenn Sie sich über die gewünschte Blickrichtung unsicher sind, lassen Sie sich von einem Referenzbild inspirieren.
- Berücksichtigen Sie die Gesamtkomposition: Stellen Sie sicher, dass die eingestellte Blickrichtung mit der Gesamtkomposition und der Stimmung des Bildes übereinstimmt.
Wenn Sie diese Schritte befolgen und mit verschiedenen Techniken experimentieren, können Sie die Blickrichtung in Ihren Fotos mit Adobe Photoshop effektiv ändern.
Ändern der Blickrichtung in Topaz Adjust:
Topaz Adjust verfügt nicht über eine spezielle Funktion zum Ändern der Augenrichtung. Sie können jedoch die Werkzeuge zur Gesichtsmanipulation und die erweiterten Bearbeitungsfunktionen verwenden, um einen ähnlichen Effekt zu erzielen. Hier ist eine allgemeine Anleitung:
- Importieren Sie Ihr Bild: Öffnen Sie Topaz Adjust und importieren Sie das Bild, das Sie bearbeiten möchten.
- Werkzeug verflüssigen: Verwenden Sie das Verflüssigen-Werkzeug, um die Gesichtszüge, einschließlich der Augen, manuell anzupassen. Seien Sie vorsichtig, denn dies erfordert Präzision und Geschick.
- Face Recovery Tool: Wenn das Bild unscharf oder von schlechter Qualität ist, können Sie mit dem Werkzeug "Gesicht wiederherstellen" die Gesichtsdetails verbessern, was indirekt auch die Klarheit und Schärfe der Augen verbessern kann.
- Sonstige Anpassungen: Experimentieren Sie mit anderen Werkzeugen wie Scharfzeichnen, Rauschunterdrückung und Farbabgleich, um die Bildqualität insgesamt zu verbessern, was sich indirekt auf die Darstellung der Augen auswirken kann.
- Vorschau und Export: Zeigen Sie die Änderungen in der Vorschau an und exportieren Sie das endgültige Bild.
Tipps und Tricks für eine wirksame Manipulation der Blickrichtung
Experimentieren Sie mit verschiedenen Einstellungen
- Intensität: Passen Sie die Intensität der Änderung der Blickrichtung an, um den gewünschten Effekt zu erzielen. Für subtile Änderungen kann eine subtile Anpassung ausreichend sein, während für dramatische Effekte eine drastischere Änderung erforderlich sein kann.
- Winkel: Experimentieren Sie mit verschiedenen Winkeln der Augenrotation, um verschiedene Looks und Ausdrücke zu kreieren.
- Symmetrie: Stellen Sie sicher, dass die Augen symmetrisch ausgerichtet sind, um ein natürliches Aussehen zu erzielen. Nehmen Sie ggf. kleinere Korrekturen vor, um ein Gleichgewicht zu erreichen.
Kombinieren mit anderen Bearbeitungswerkzeugen
- Gesichtszüge: Kombinieren Sie die Änderung der Augenrichtung mit anderen Gesichtsmerkmalen, wie z. B. der Form der Augenbrauen oder des Mundes, um ein stimmigeres Aussehen zu erzielen.
- Farbkorrektur: Passen Sie die Farbbalance, die Sättigung und den Kontrast des Bildes an, um die veränderte Blickrichtung zu ergänzen.
- Hintergrund-Bearbeitung: Ändern Sie den Hintergrund des Bildes, um einen geeigneteren Kontext für den Blick der Person zu schaffen.
Natürlichkeit berücksichtigen
- Vermeiden Sie Übertreibungen: Es ist zwar möglich, die Blickrichtung drastisch zu ändern, aber achten Sie darauf, dass die Ergebnisse natürlich und glaubwürdig wirken. Übertriebene Manipulationen können künstlich wirken und die Gesamtwirkung des Bildes beeinträchtigen.
- Siehe Referenzbilder: Wenn Sie sich nicht sicher sind, welche Richtung die Augen haben sollen, lassen Sie sich von Referenzbildern inspirieren. Vergleichen Sie die natürliche Augenposition im Referenzbild mit Ihrem bearbeiteten Bild, um ein realistisches Ergebnis zu erzielen.
Wenn Sie diese Tipps befolgen und mit verschiedenen Einstellungen experimentieren, können Sie die Blickrichtung in Ihren Fotos effektiv beeinflussen und visuell ansprechende und fesselnde Bilder erstellen.
Die Auswahl der Besten : EraseID
- Die AI-Augenrichtungsmanipulation bietet eine bequeme und effektive Möglichkeit, die Wirkung und das Engagement Ihrer Fotos zu verbessern.
- Mit diesen Werkzeugen können Sie natürlichere und visuell ansprechendere Bilder erstellen.
- Mit KI-Tools können Sie im Vergleich zu herkömmlichen manuellen Bearbeitungstechniken Zeit und Mühe sparen.
Ergreifen Sie eine Maßnahme:
Sind Sie bereit, Ihre Fotos mit der Leistung der KI-Änderung der Blickrichtung zu verändern? Testen Sie EraseID noch heute und erleben Sie den Unterschied aus erster Hand. Teilen Sie Ihre Ergebnisse und Erfahrungen in den sozialen Medien und ermutigen Sie andere, es auszuprobieren.
Indem Sie die KI-Manipulation zur Änderung der Blickrichtung in Ihren Fotobearbeitungs-Workflow integrieren, können Sie Ihre fotografischen Fähigkeiten verbessern und fesselndere und wirkungsvollere Bilder erstellen.
Weitere Leitfäden zum Nachschlagen:
- Wie man mit Smiling Face AI fröhliche Vorschaubilder erstellt
- Verbessern der Fotoauflösung für den Druck
- Einfache Anleitung, wie man mit KI sein Gesicht verändert!
- Bestes kostenloses Tool zum Verbessern Ihrer Bilder
- Wie man mit KI ein Bild klarer macht
- AI Face Fixer, den Sie für starke Kreativität kennen sollten
Durch die Integration von EraseID in Ihren Fotobearbeitungs-Workflow können Sie Ihrer Kreativität freien Lauf lassen und beeindruckende Bilder erstellen, die Aufmerksamkeit erregen und einen bleibenden Eindruck hinterlassen.