Table of Contents
Getting Started with EraseID
EraseID is an AI-powered tool for generating, modifying, and enhancing facial features with precision. Whether you need to anonymize faces, create localized visuals, or refine facial details, EraseID streamlines the process with advanced AI technology.
Uploading Images
EraseID supports images in **JPEG, PNG, TIFF, webp, with a maximum resolution of 7K pixels per side.
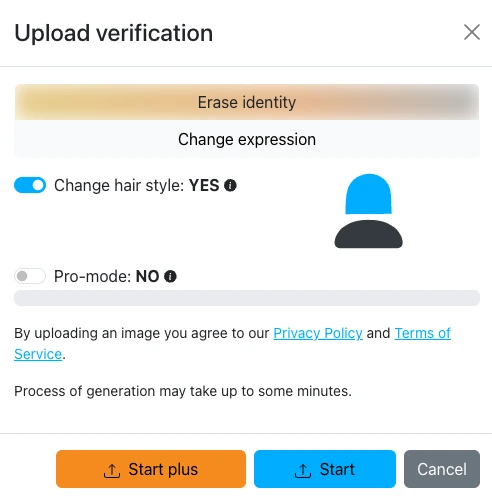
EraseID offers two upload modes:
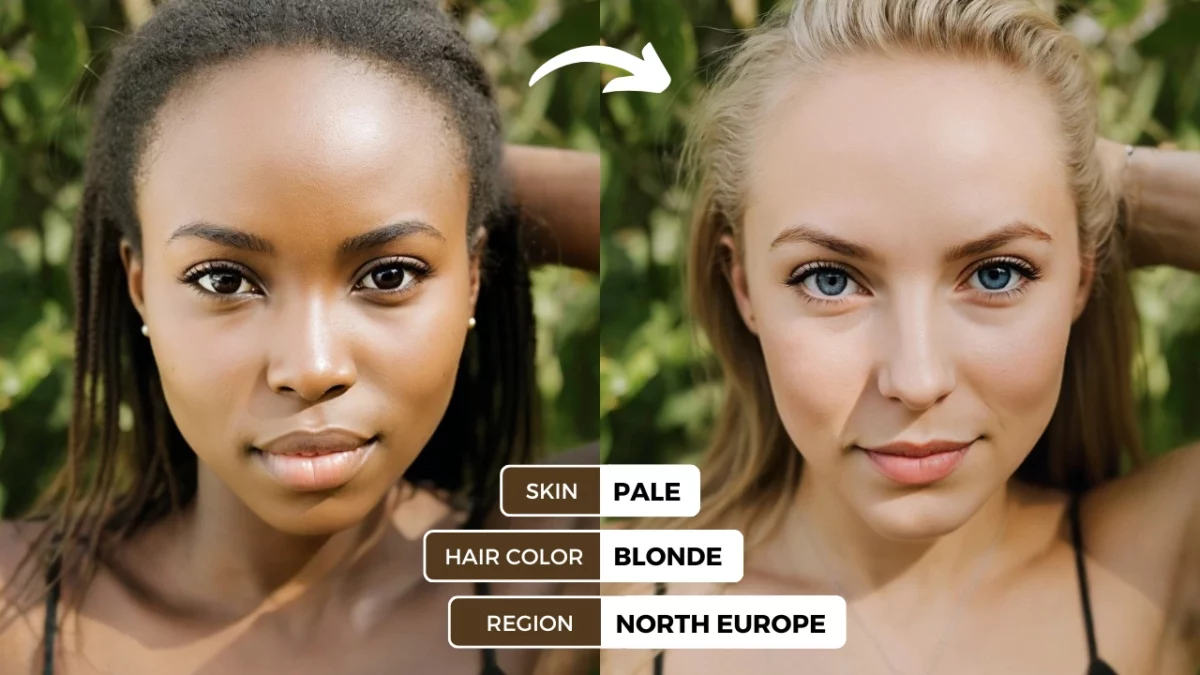
- Random Identity Mode: Generates unique facial identities with customizable attributes like age, region, expression, and hair.
- Change Expressions Mode: Modifies emotions while preserving identity, allowing for adjustments like changing a smile or gaze.
When uploading, users can decide whether they want to change only the face or modify the hairstyle as well by toggling the respective option. They can also enable Pro Mode, which allows them to select keywords first before generating an identity, skipping the initial random generation step.
EraseID also provides features for identity consistency, hair customization, and body skin tone adjustments. Developers can integrate EraseID’s capabilities through a well-documented API. Whether you need to anonymize faces, create localized visuals, or refine facial details, EraseID streamlines the process with advanced AI technology.
Upload Mode: Random Identity
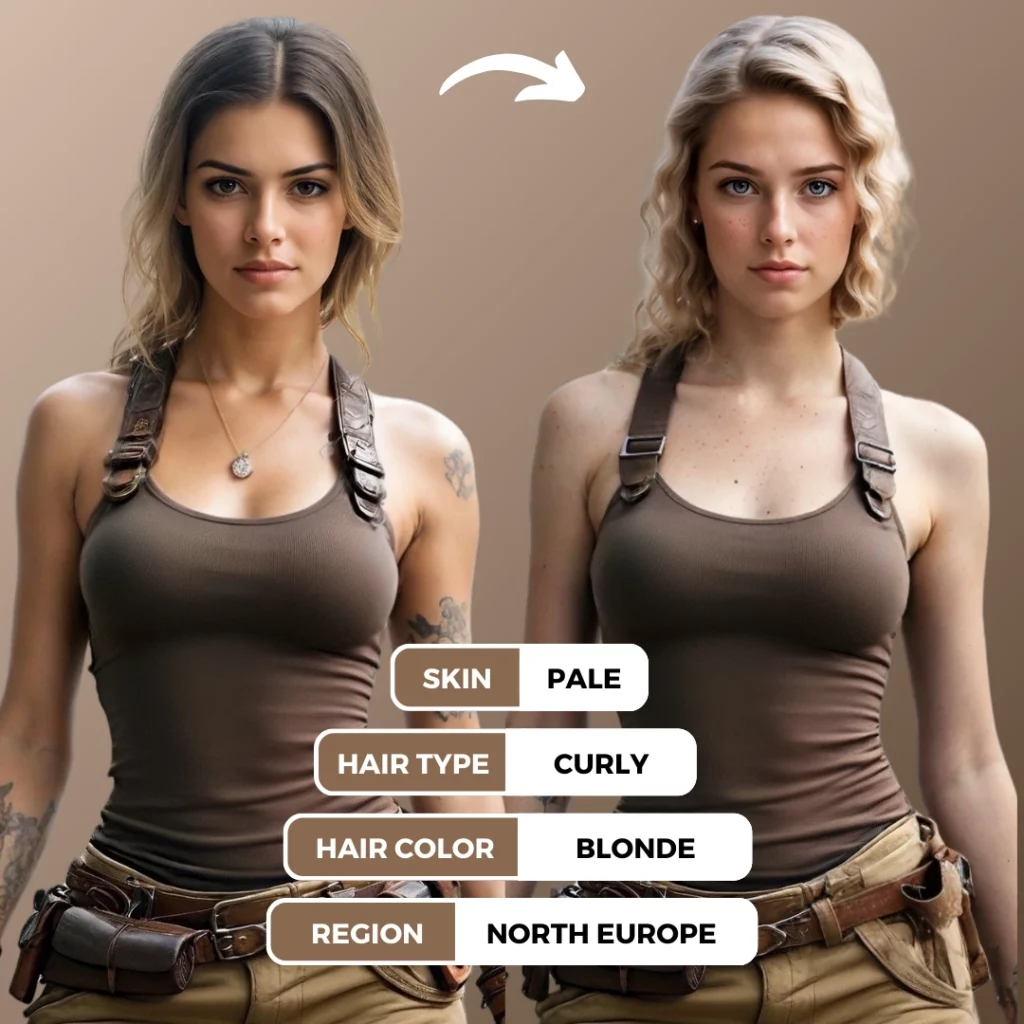
EraseID enables the creation of unique identities with extensive customization options, allowing you to modify:
- Age
- Country or Region
- Expressions and emotions
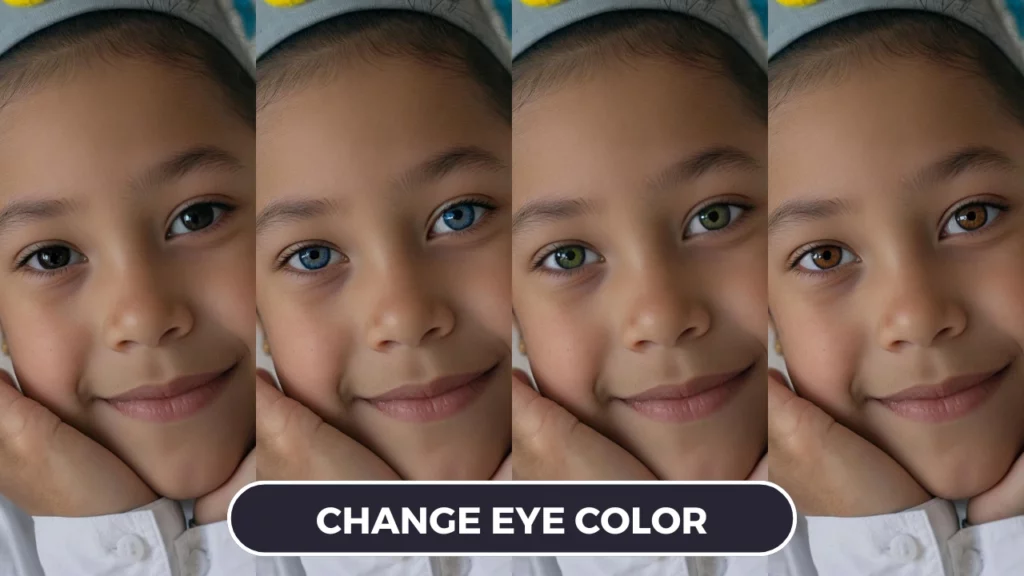
- Eye color and shape
- Nose, mouth, and teeth
- Skin tone
- Hair type, color, style, and length
Go to Edit mode and simply enter a facial attribute like “Skin,” then select keywords such as “pale” or “natural,” or explore the available keywords to create the perfect combination.
You can also mix keywords for more precise results, such as “Ireland, red hair & freckles” or “Congo, dark skin.”
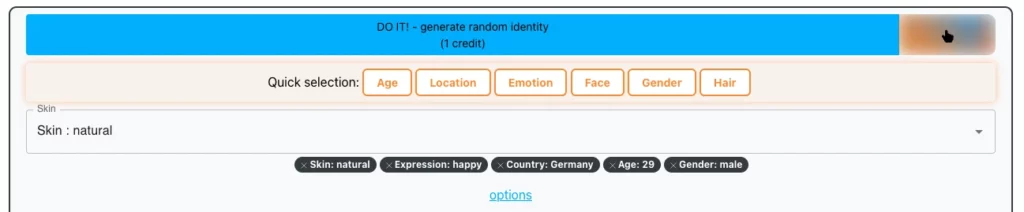
Then, click on the “DO IT! Generate a random identity” button to request a new generation. The new face variation based on the chosen keywords will appear below the option menu after approximately 10 seconds.
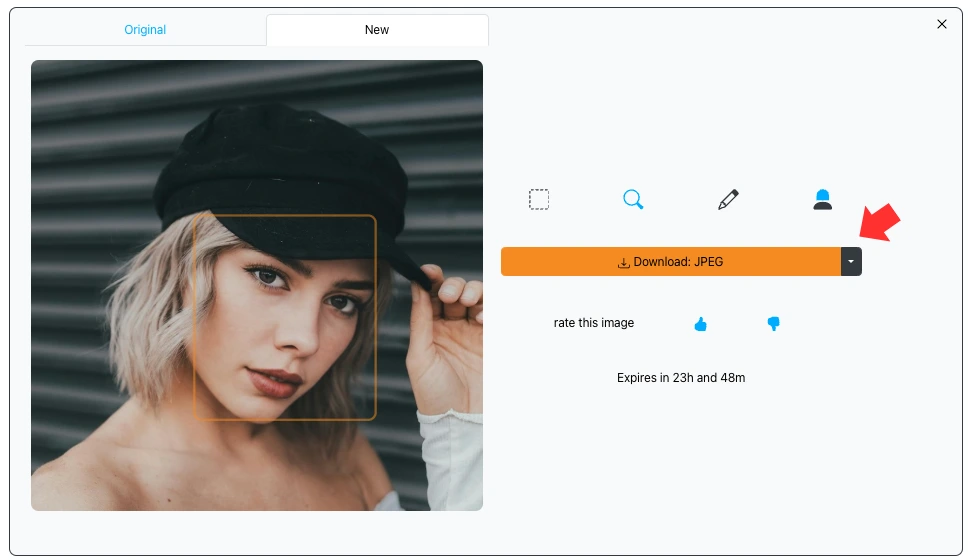
To apply the generated face:
1. Click PICK to replace the generated face in the original image.
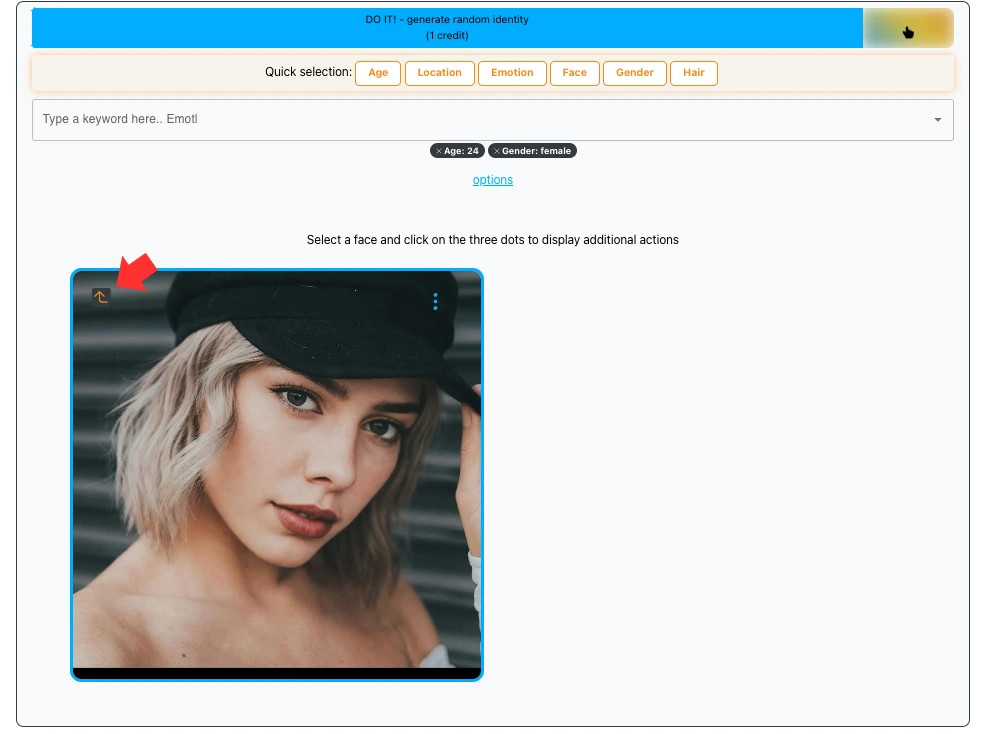
2. Download the final image in PNG or JPEG formats.
Adjusting Parameters in EraseID
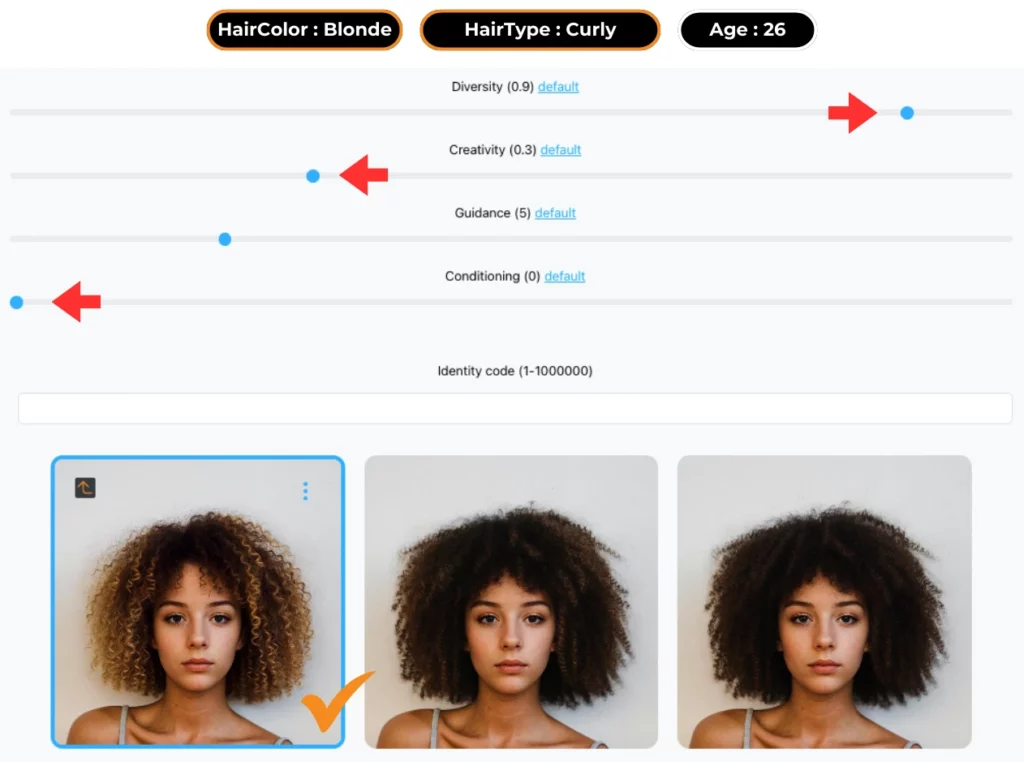
The parameters section in the Options menu allows you to fine-tune how faces are generated and modified. By adjusting key settings like Diversity, Creativity, Guidance, and Conditioning, you can control the uniqueness, precision, and adherence of the AI to your input preferences.
These parameters help customize facial features, hair, and expressions while ensuring consistency when needed. Below, you’ll find explanations of each setting and how to use them to get the best results.
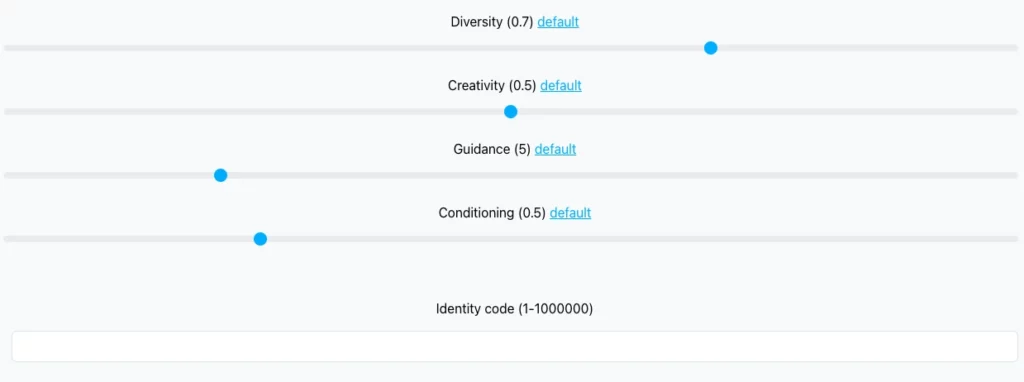
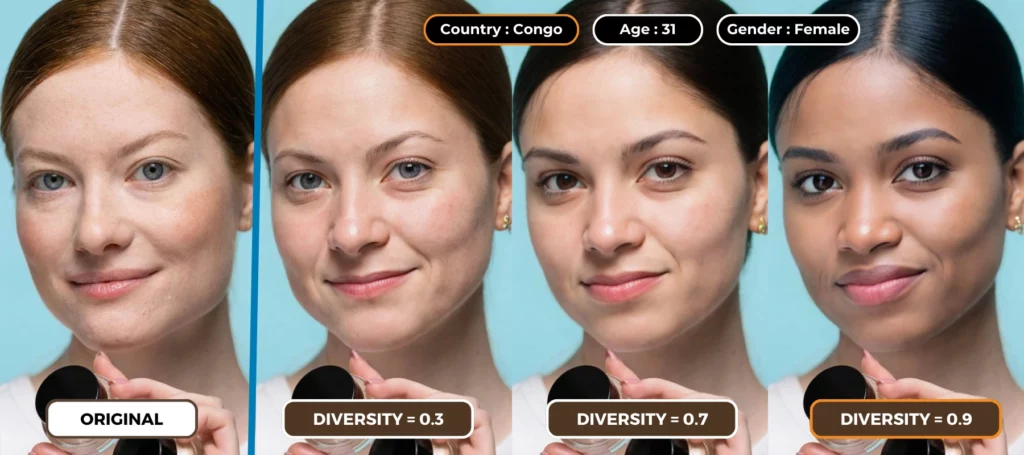
Diversity
Diversity controls how similar or different the generated face is from the original.
- Lower values keep it closer to the original.
- Higher values produce a wider range of outputs, making the AI less constrained.
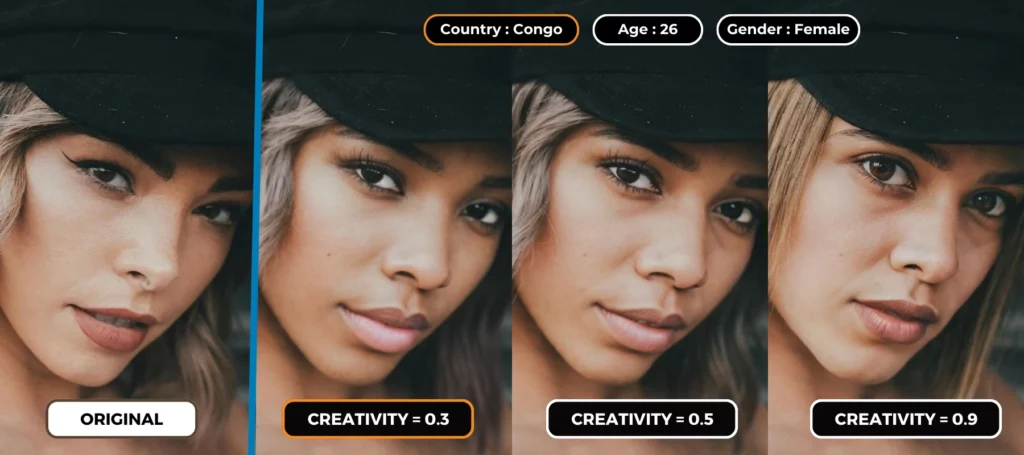
Creativity
The Creativity setting controls how much variation the AI introduces into the generated face. Higher values allow for more dynamic and diverse results, including slight adjustments in head positioning and facial details. However, the impact of creativity varies depending on the attribute:
- For age and country, higher creativity may introduce unintended variations, making the output less predictable,so values between 0.3 and 0.5 might work better.
- For hair features, increasing creativity tends to enhance results by adding more natural detail and variation, where values around 0.6 to 0.7 might give desired results.
Because of these differences, adjusting the Creativity setting based on the specific attributes you want to refine can improve results. If the AI isn’t accurately following your selected attributes—such as inconsistencies in facial and neck skin tones—try lowering the setting for a more precise match.
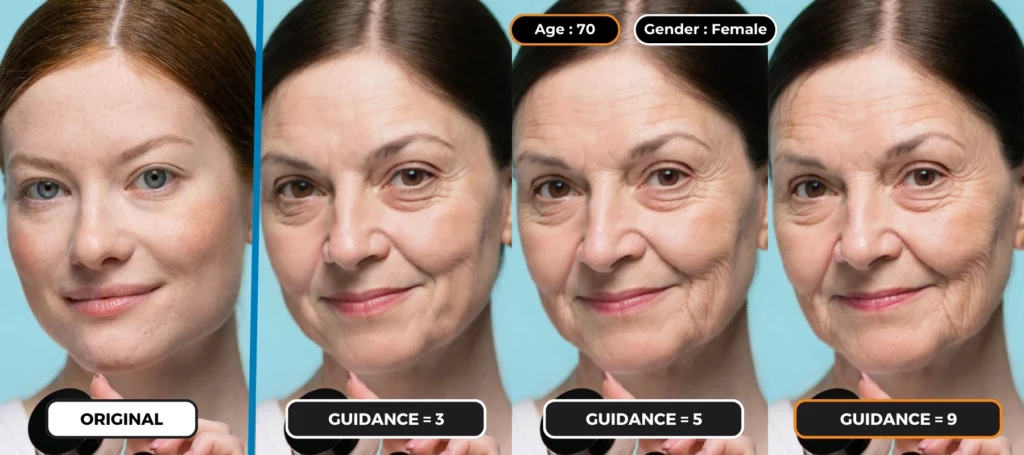
Guidance
Guidance determines how strictly the AI follows your instructions.
- Higher values ensure closer adherence but may sometimes create unnatural effects (e.g., overly bright colors).
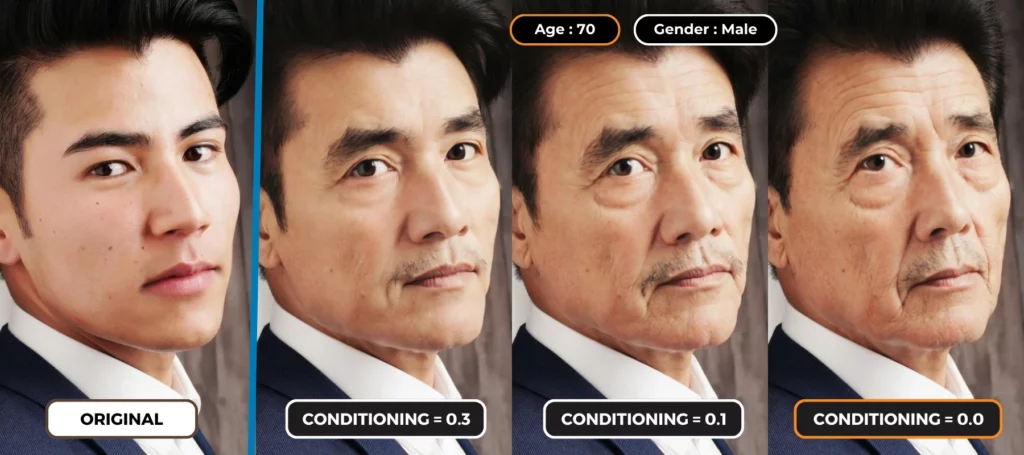
Conditioning
Conditioning controls how much of the original face shape, pose and rotation is retained.
- Lower values allow for bigger changes (e.g., altering hairstyles or changing age).
- Default settings preserve key facial features while making modifications.
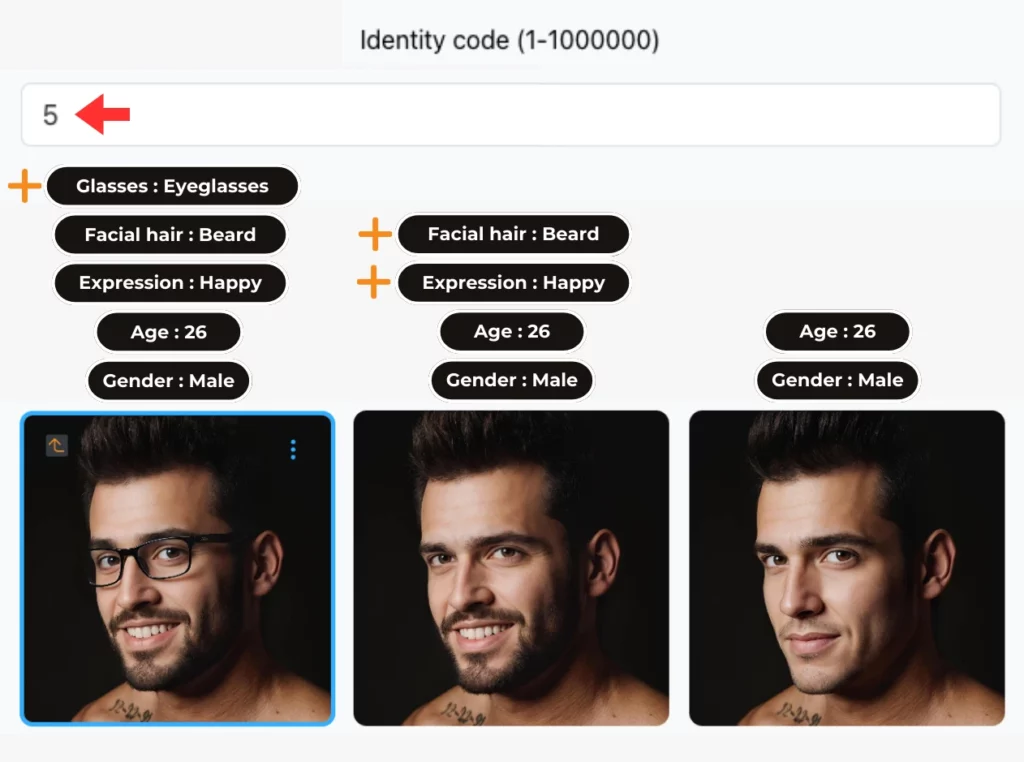
Random Identity Code
The Random Identity Code (SEED) feature allows for reproducible results with the same identity when searching for the right keywords. Simply add a random number before generation and continue generating while experimenting with different keywords or parameters.
Edit Body Skin
Once a generated face is created, EraseID allows you to apply matching body skin tones to achieve a seamless and realistic appearance. This advanced feature ensures that the face blends naturally with the body, enhancing the overall quality of the image. The skin tone matching process helps eliminate inconsistencies, making the final result indistinguishable from an unedited photo.
In this EraseID tutorial, you’ll learn how this feature is particularly valuable for privacy protection, as it increases the level of anonymization by blending out identifiable elements such as tattoos or scars. Whether you’re editing images for personal projects or professional use, the ability to harmonize facial and body skin tones makes EraseID a powerful tool for creating polished and anonymous visuals.
Read more: Ethnicity generator to transform global campaigns
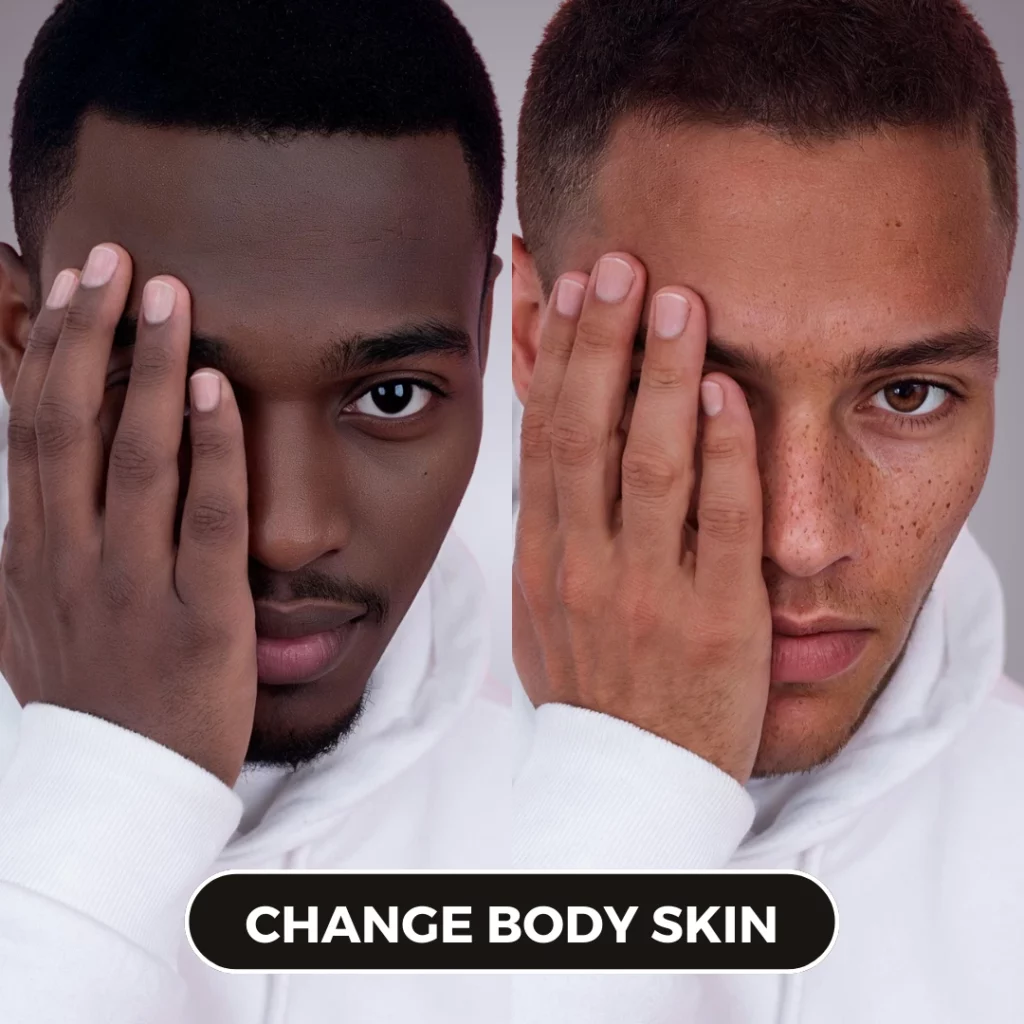
How to Use the Full-Body Skin Feature:
- Click on the three blue dots menu on the generated face.
- Select Change body skin.
- The system will apply a consistent skin tone across the face and body, enhancing realism while improving anonymization.
Note: If the generated body skin doesn’t match as expected, try again; each result will be different for every attempt.
You can always restart from the original image if you notice any mismatches in the replaced areas. This can be especially useful after replacing faces or skin, particularly if the mask was manually adjusted. Click on ‘Options’ and select ‘Reset Full Image‘ to revert to the original.
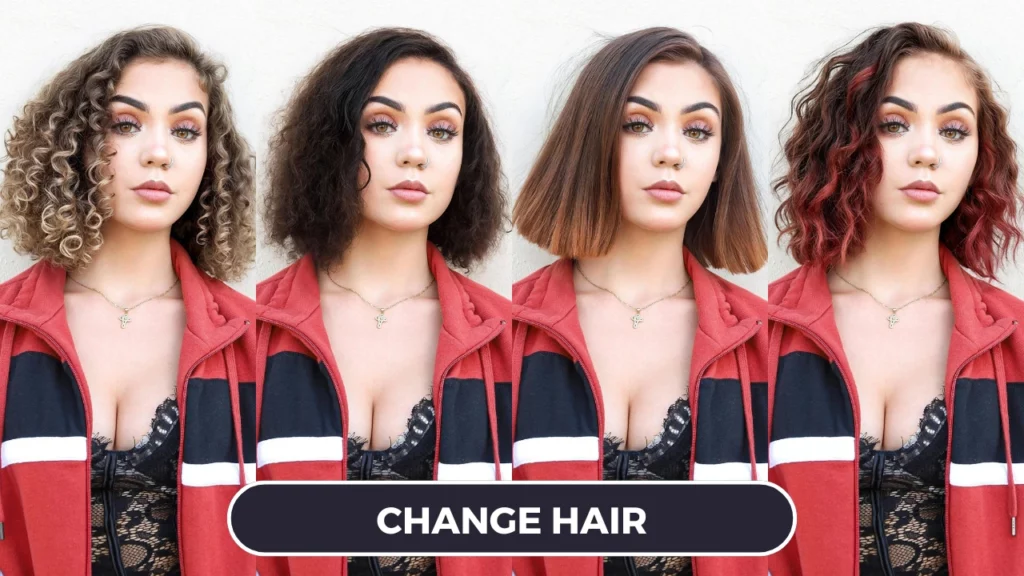
Two Ways to Change Hair in EraseID
EraseID allows you to modify hairstyles while maintaining a consistent identity. Whether you want to adjust the hair of an existing model or customize the hairstyle of an AI-generated face, you have two flexible options.
- Change Hairstyle on Your Existing Model – This method lets you edit the hair while keeping the original face unchanged.
- Change Hairstyle on an EraseID-Generated Model – This approach modifies the hair on a fully AI-generated identity.
By using masking and keyword adjustments, this EraseID tutorial allows you to fine-tune hair type, length, color, and style for highly precise customization. This feature is essential for achieving the exact appearance you envision, whether you’re making subtle tweaks or creating entirely new hairstyles.
Change Hairstyle on Your Existing Model
Modify the hair while keeping the original face.
Steps:
- Upload your image.
- Click the three dots on the generated face → Reset Original (this restores your original face).
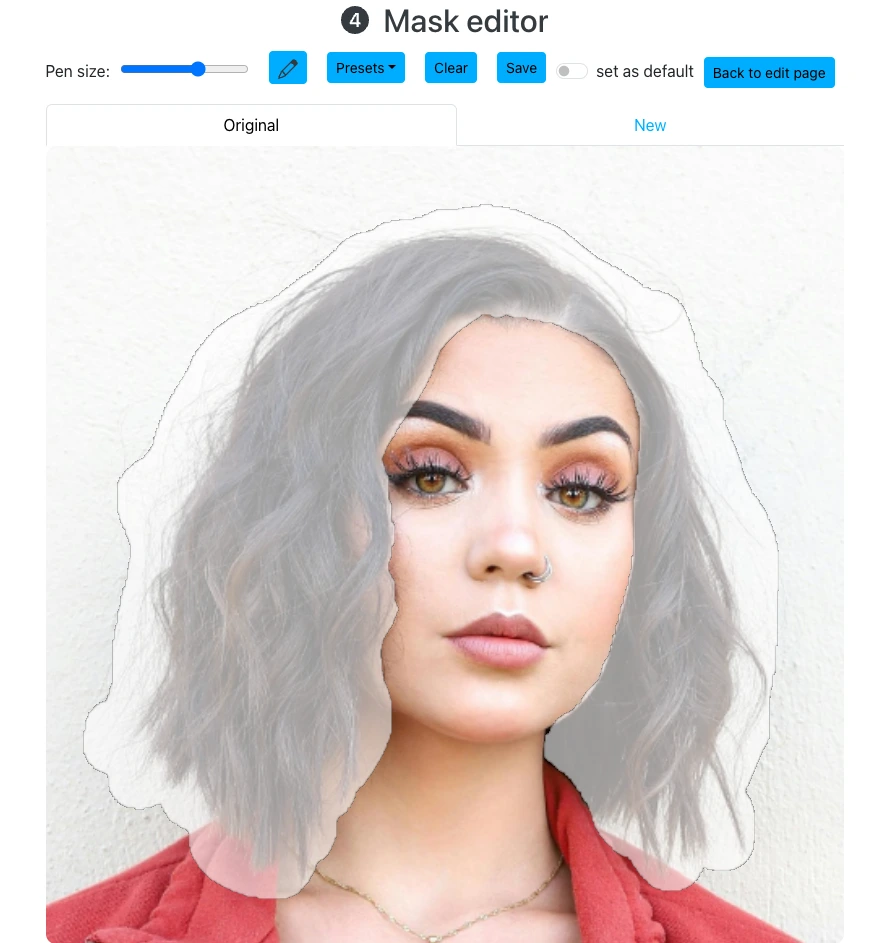
- Click the three dots again → Mask Editor.
- Clear the mask → Set as default & Save.
- Click DO IT! to generate a new image with your uploaded original face.
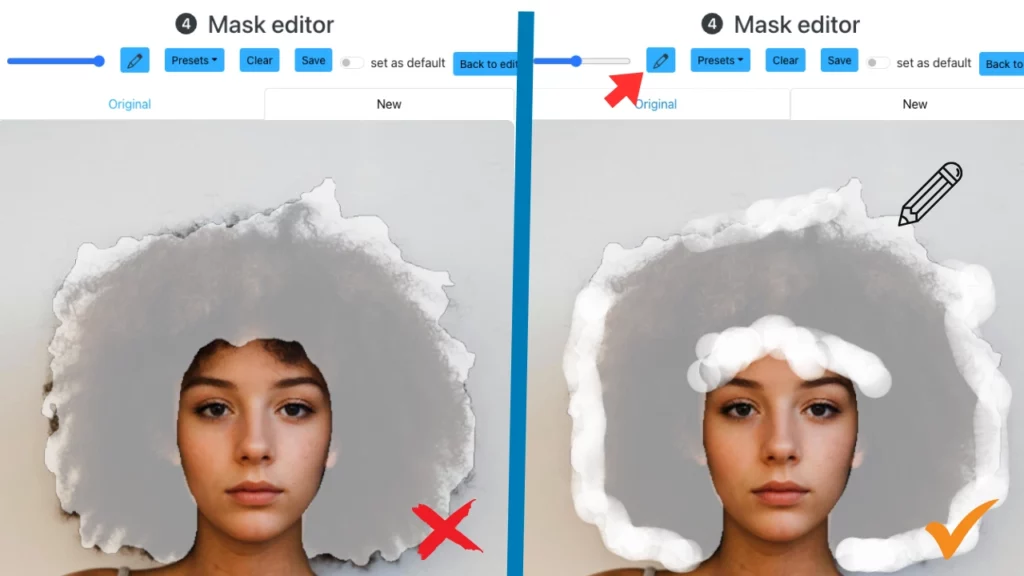
- Open Mask Editor → Mask the hair (select only the hair area), Set as default & Save.
- Apply modifications: Add keywords for the following attributes: hair type, style, length, and color.
- To achieve bigger variations, adjust:
- Decrease: Conditioning
- Increase: Diversity, Creativity, and Guidance
- Enter Mask Editor and mask the face in addition to the already masked hair.
- (Optional) Click the three blue dots → Add Details for further refinements.
Change Hairstyle on an EraseID-Generated Model
Modify the hair on a face generated by EraseID.
Steps
- Upload your image.
- Click the three dots on the generated face → Mask Editor.
- Mask the hair → Click Save.
- Select the face with the masked hair area.
- Add keywords that describe the desired hair type, style, length, and color.
- Click the three blue dots → Regenerate.
- To achieve bigger variations, adjust:
- Decrease: Conditioning
- Increase: Diversity, Creativity, and Guidance
(Optional) Click the three blue dots → Add Details for additional refinements.
Editing Specific Facial Features
EraseID empowers you to create completely unique identities by offering a wide range of customizable facial and hair attributes. With its intuitive interface, users can easily personalize every detail to align with their vision. Whether you’re adjusting fundamental features like age, region, or gender, or fine-tuning intricate aspects such as eye color, eye shape, nose structure, and mouth appearance, EraseID provides unparalleled control over facial modifications.
This EraseID tutorial will walk you through how to leverage the platform’s advanced features to achieve the desired look. The platform enables users to modify expressions and emotions with ease, transforming neutral faces into happy, sad, surprised, or even suspicious expressions. This flexibility makes it ideal for creating dynamic visuals for various applications.
Additionally, EraseID offers comprehensive hair customization options. Users can alter hair type, color, style, and length to create the perfect look. Whether you’re aiming for subtle enhancements or dramatic transformations, every aspect of a face can be tailored to produce highly realistic and personalized images. With EraseID, creating lifelike digital identities has never been more accessible or efficient.
Read more: AI Generated ID using EraseID
Steps to Edit a Specific Feature
- Upload an image in “Random Identity” mode
- Reset & Prepare the Mask
- Click the three dots menu on the generated face → Reset Original.
- Open Mask Editor, delete the existing mask, and save as default.
- Generate the Original Face
- Click the “DO IT!” button to generate the original face.
- Select the face and return to the Mask Editor.
- Mask the Feature You Want to Edit
- Mask only the area you want to modify (e.g., mouth, nose, eyes).
- Refine the Edit
- Add relevant keywords for the selected feature.
- Optionally adjust parameters for better results and click on regenerate.
- Apply & Finalize
- (Optional) Use Add Details in the three dots menu for higher quality.
- Click Pick to apply the edited feature.
Add Details
The “Add Details” feature enhances the generated face by applying an upscaling process, adding more structure to the skin for a more natural and refined look.
Learn more about adding details to your images using our guide on AI Face Enhancer.
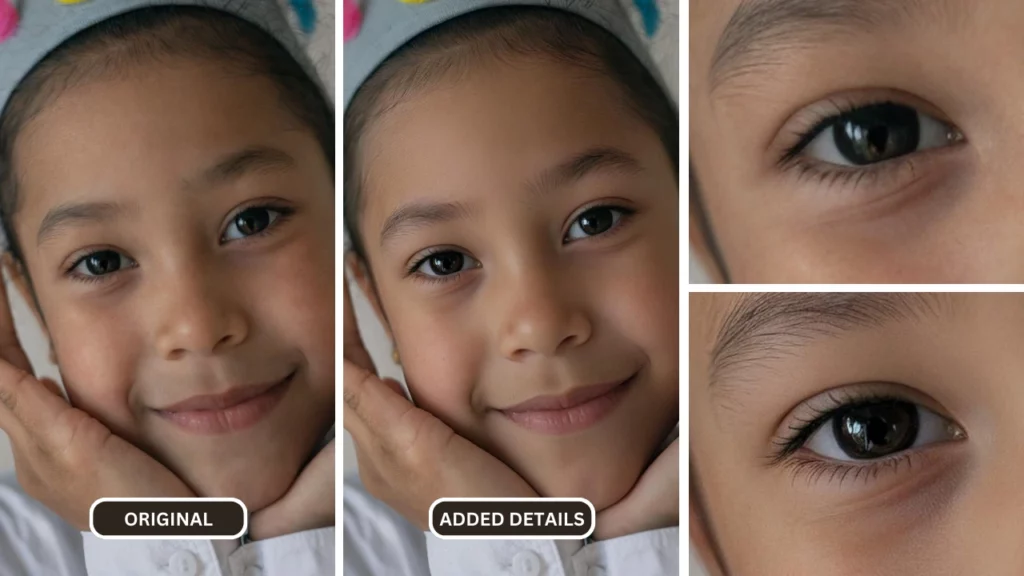
Key Benefits:
- Removes unwanted artifacts in the generated face
- Improves eye details, including correcting pupil shapes
- Enhances skin texture for a more realistic appearance
How to Use "Add Details":
- Click on the face in your image.
- Click the three blue dots menu.
- Select “Add Details.”
This feature works regardless of facial region size, improving overall image quality while adding depth and texture to the skin. With EraseID tutorial you can learn to add details in your images and make sure the details are perfect.
Consistent identity
Consistent identity is a powerful feature in the EraseID app that allows you to maintain the same facial identity across multiple images. With this functionality, you can store EraseID-generated identities or your own uploaded identities directly within the platform.
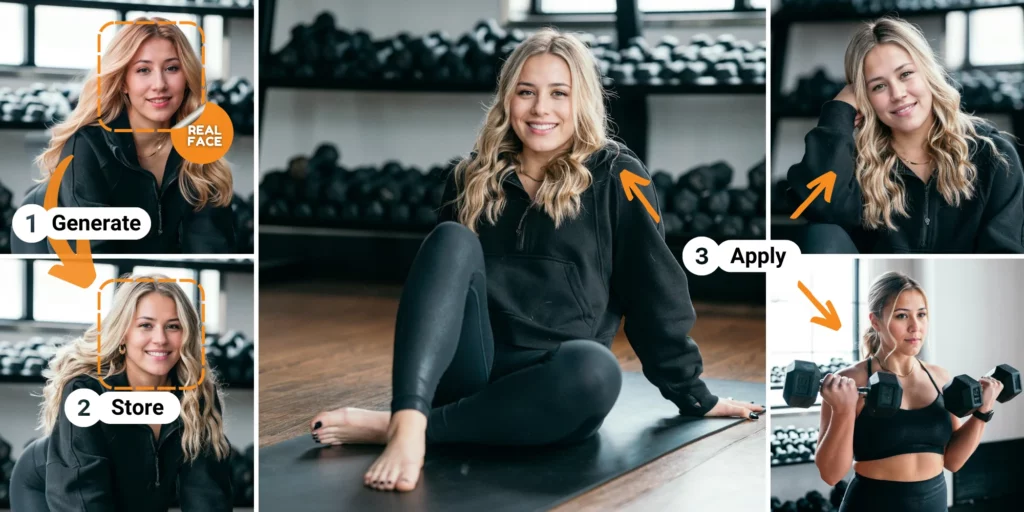
This ensures that the same face can be reused across different projects, making it ideal for creating cohesive visuals in marketing campaigns, video productions, or gaming environments. The consistent identity feature in the EraseID tutorial makes it easier to generate multiple variations of the same person with different expressions, hairstyles, or accessories while preserving facial characteristics.
This seamless identity management helps users achieve more realistic and unified results without needing to recreate faces from scratch.
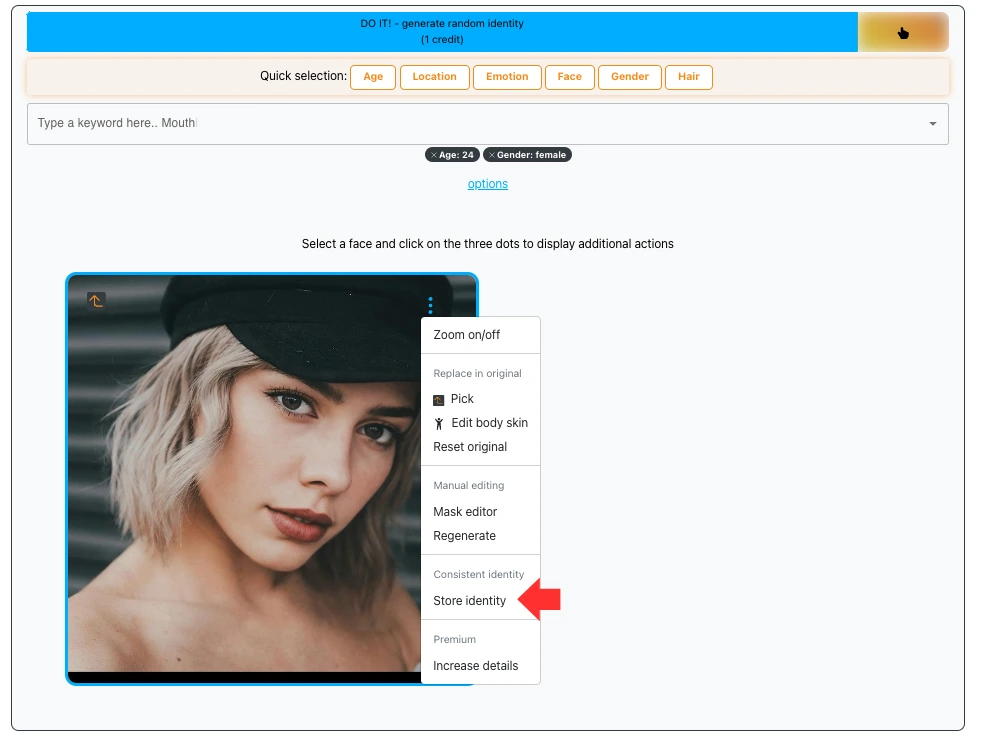
Workflow for Storing an EraseID-Generated Identity
- Generate a face.
- Click the three blue dots on the generated face, go to Mask Editor.
- Mask the face or select Face+Hair in Presets, then Save.
- Click the three blue dots menu again and select Store Identity.
- Name the identity and save it.
Workflow for Saving an Uploaded Identity
- Upload an image of the person using the Erase Identity option.
- In “Do you want to change hairstyle?” → Choose “Yes.”
- Enter Edit Mode.
- Click the three blue dots on the first generated face → Reset Original.
- Open Mask Editor (again in the three blue dots menu), clear the mask, set it as default, and save.
- Click New Face → EraseID will regenerate the original face.
- Click the three blue dots on the regenerated face, go to Mask Editor, mask the face or select Face+Hair in Presets, and Save.
- Click the three blue dots menu again, select Store Identity, name it, and save it.
Generating Stored Identities in Other Images
- Upload an image → Choose the option “With Hair.”
- Locate the flashing arrow on the right side of the orange “DO IT” generation button.
- Select “Consistent Identity Mode.”
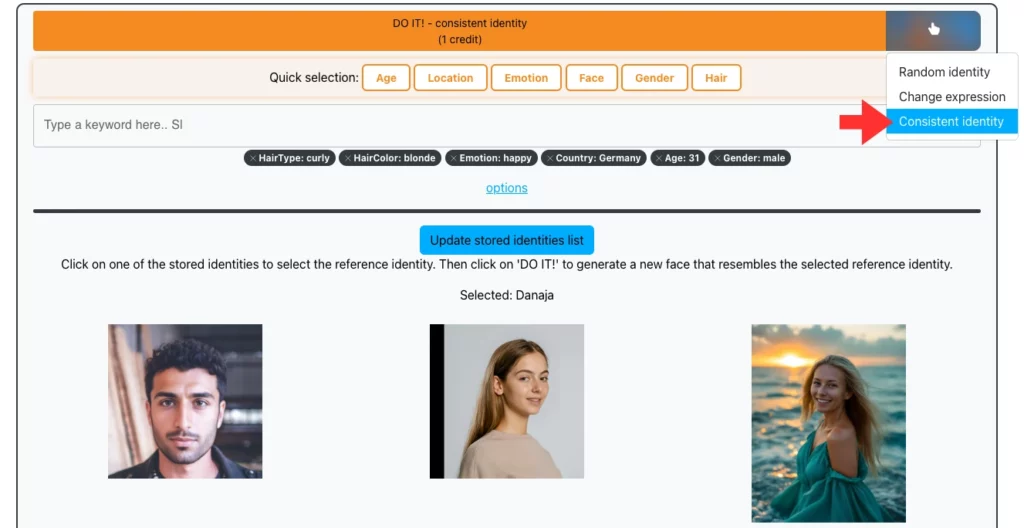
4. Select the Stored Identity, then click “Use this face – Consistent Identity.”
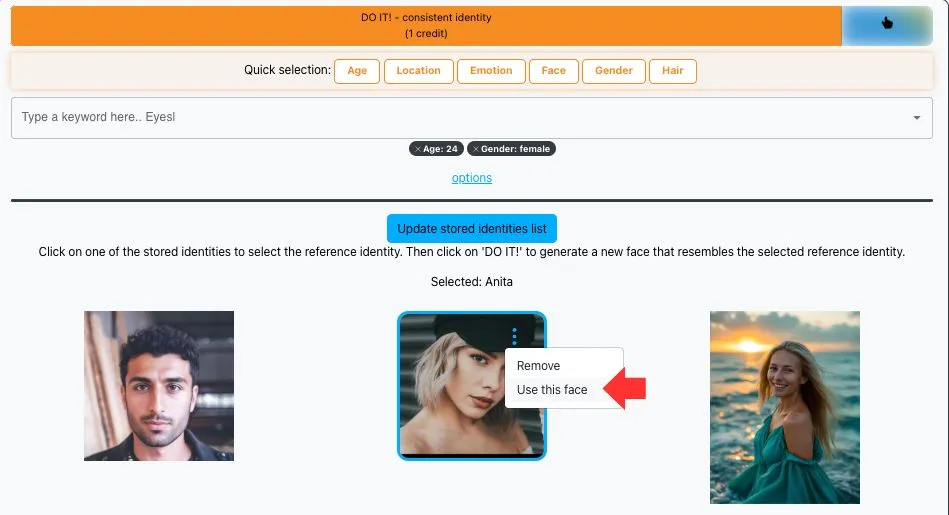
5. Adjust Similarity (increase for a closer match to your stored identity).
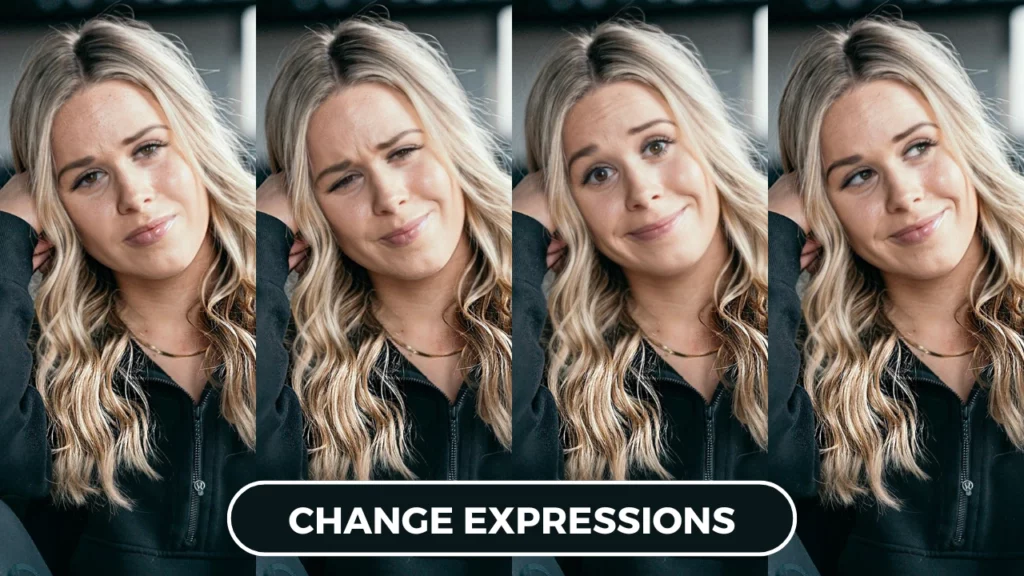
Upload Mode: Change Expressions
EraseID enables you to modify facial expressions with precision, keeping the person’s identity. Whether you need to make a face appear happier, more neutral, or even suspicious, this feature gives you full control over the character’s look.
You can also fine-tune gaze direction and eye openness for a more natural and dynamic result. Additionally, EraseID allows you to combine multiple expressions, blending different emotions to create a customized facial appearance.
Below, you’ll find step-by-step instructions on how to edit and mix expressions effectively.
Additional Resource: Leveraging PiktID as a Powerful Face Expression Changer
Edit Faces
EraseID allows you to alter faces by:
- Adjusting expressions (e.g., Happy, Neutral, Suspicious)
- Changing gaze
- Opening eyes
To modify an expression:
- Upload a face.
- Click on quick buttons that represent a desired expression, gaze, or eye adjustment (such as open, close, or wink).
Intensify an Expression
Once you have generated a face with the desired emotion using EraseID, you can further enhance or amplify the expression to achieve the perfect look. The “Regenerate” feature in the EraseID tutorial allows users to refine the existing facial expression with just one click. Whether you’re aiming to make a smile wider, a sad face more melancholic, or a surprised look more intense, this functionality helps you achieve more pronounced emotions while preserving the natural appearance of the face.
The advanced AI algorithms ensure that every adjustment blends seamlessly into the image, delivering highly realistic results without any visible artifacts. This feature is particularly useful for digital artists, content creators, and marketers who need to fine-tune facial expressions to fit their creative vision.
Combine Expressions
EraseID also allows you to blend multiple expressions into one.
Steps:
- Select a face with an existing expression (e.g., Happy).
- Enter a keyword for an additional expression (e.g., Suspicious).
Click “Regenerate” in the three blue dots menu on the selected face.
FAQ (Frequently Asked Questions about EraseID and its features)
How long are my images stored?
Uploaded and generated images can be edited for 24 hours, after which they are permanently deleted from our servers.
Are my images used for AI training?
No. Neither uploaded nor generated images are used for any kind of training or data collection.
What is the maximum image resolution?
EraseID supports images up to 7K resolution. For higher resolutions, please contact us.
Are the generated faces based on real people?
No, all faces generated by EraseID are non-existing identities. We do not own any copyright over them, and they are not based on real individuals.
Can EraseID ensure full anonymization of faces?
Yes, EraseID provides powerful tools for face anonymization, however, it is your responsibility to evaluate and verify whether the anonymized images meet your requirements.
Can I use EraseID commercially?
Yes, EraseID-generated images can be used for commercial purposes, as long as they comply with legal and ethical guidelines.
Is there an API for developers?
Yes! EraseID offers a fully documented API that allows developers to integrate face editing and localization features into their own applications. Check our API documentation for more details.