1. Comparing AI over Traditional Methods to Sharpen Images:
Have you ever captured a moment that should have been perfect, only to find the final image blurry and disappointing? A shaky hand at a wedding, a fleeting candid shot at a birthday party, or even a photo taken in low light conditions can all result in blurry photos that leave cherished memories looking lackluster. But fear not! Image sharpening techniques can be your knight in shining armor, restoring clarity and detail to your blurry photos and bringing those special moments back to life by learning how to sharpen a blurry image using traditional and modern approach.
This guide post will understand the world of sharpening, exploring both traditional methods used in software like Photoshop and the magic of AI-powered sharpening tools like SuperID. By the end, you’ll be equipped with the knowledge to choose the best approach for your specific needs and transform your blurry photos into crisp, clear visuals.
The Pain of Blurry Photos: A Common Challenge
Let’s face it, blurry photos are a common occurrence. Imagine that perfect wedding photo you envisioned – the bride and groom beaming with joy, surrounded by loved ones. But upon closer inspection, the image appears blurry, robbing the moment of its emotional impact. Similarly, special occasions like birthday parties, graduations, or family reunions can be marred by blurry photos. Fortunately, sharpening techniques offer a solution to bring those blurry memories back into focus.
2. Traditional Sharpening: A Step-by-Step Guide with Photoshop
Traditional sharpening methods involve manipulating image filters within editing software like Photoshop. While these methods can be effective, they require some technical knowledge and can be time-consuming. Here’s a step-by-step guide on how to sharpen a blurry image using Photoshop:
a. Open Your Blurry Image:
- Launch Photoshop and navigate to the “File” menu.
- Select “Open” and locate the blurry photo you want to sharpen from your computer.
- Click “Open” to load the image into the Photoshop workspace.
b. Duplicate the Background Layer (Optional but Recommended):
- In the Layers panel (usually located on the right side of the workspace), find the layer named “Background.”
- Right-click on the “Background” layer and select “Duplicate Layer” from the context menu.
- This creates a working copy of the image, allowing you to experiment with sharpening without altering the original photo. You can rename the duplicated layer for easier identification (e.g., “Sharpened Copy“).
c. Navigate to the Filter Menu:
- Locate the top menu bar in Photoshop.
- Click on the “Filter” menu and then hover over the “Sharpen” submenu.
d. Choose a Sharpening Filter:
Photoshop offers various sharpening filters, each with slightly different effects. Here are two popular options:
- Unsharp Mask: This is a widely used filter for basic sharpening.
- Amount: Adjusts the strength of the sharpening effect. Higher values result in more sharpening but can also introduce unwanted artifacts.
- Radius: Controls the area affected by the sharpening. A larger radius sharpens a wider area around the edges in the image.
- Threshold (Optional): Ignores sharpening on areas with low contrast.
- Smart Sharpen: This filter offers more advanced controls compared to Unsharp Mask.
- Amount: Similar to Unsharp Mask, controls the sharpening strength.
- Radius: Similar to Unsharp Mask, controls the area affected by the sharpening.
- Reduce Noise: Minimizes noise artifacts that might appear during sharpening. A higher value reduces noise but can also soften the image.
Sharpening Filter Comparison Table:
| Feature | Unsharp Mask | Smart Sharpen |
| Controls | Amount, Radius | Amount, Radius, Reduce Noise |
| Effect | Basic sharpening | More advanced sharpening with noise reduction |
| Use Case | Good starting point for basic sharpening | Offers more control for detailed sharpening and noise reduction |
e. Apply and Refine (Optional):
- Once you’ve adjusted the filter settings to your satisfaction, click “OK” to apply the sharpening effect to the image.
- You can further refine the sharpening by adjusting the layer opacity of the sharpened copy in the Layers panel. Reducing the opacity can provide a more subtle sharpening effect.
Limitations of Traditional Sharpening
While traditional sharpening methods offer some improvement to blurry photos, they have limitations to consider:
- Trial and Error: Finding the optimal sharpening settings can be a process of trial and error, requiring adjustments based on the specific image and the desired level of sharpening.
- Risk of Artifacts: Over-sharpening an image can introduce unwanted artifacts like halos around edges, which can further detract from the image quality. These halos appear as light or dark outlines around sharpened areas.
- Limited Control: Traditional methods may not always provide the level of detail enhancement or noise reduction that you might desire, especially for heavily blurred images.
3. The Rise of AI Sharpening: A Powerful Alternative
The world of image editing is constantly evolving, and traditional sharpening methods are being challenged by the power of Artificial Intelligence (AI). AI-powered sharpening tools are revolutionizing the way we enhance blurry photos. These tools utilize sophisticated algorithms to analyze the image and selectively sharpen details while minimizing noise.
a. How AI Sharpens Images: Unveiling the Tech Behind the Magic
Here’s a simplified breakdown of how AI tackles blurry photos:
- Intelligent Image Analysis: The AI algorithm meticulously analyzes the image, identifying areas that appear blurry or lacking in definition.
- Selective Sharpening: Instead of applying a blanket sharpening effect, the AI selectively sharpens specific regions of the image where detail enhancement is needed. This preserves smooth textures in areas that are already clear.
- Detail Enhancement: More advanced AI algorithms may even go beyond basic sharpening. They can potentially recover lost details and textures in blurry images, creating a more natural and visually appealing outcome.
b. The Advantages of AI Sharpening:
AI sharpening offers several advantages over traditional methods:
- Superior Results: AI algorithms often achieve superior sharpening results compared to manual adjustments, preserving natural image details and minimizing noise amplification.
- Ease of Use: AI-powered sharpening tools are incredibly user-friendly. No need to fiddle with complex sliders or settings. Simply upload your image and let the AI do its magic.
- Faster Processing: AI sharpening tools can often process and enhance your blurry photos in a matter of seconds, saving you valuable time compared to the trial-and-error approach of traditional methods.
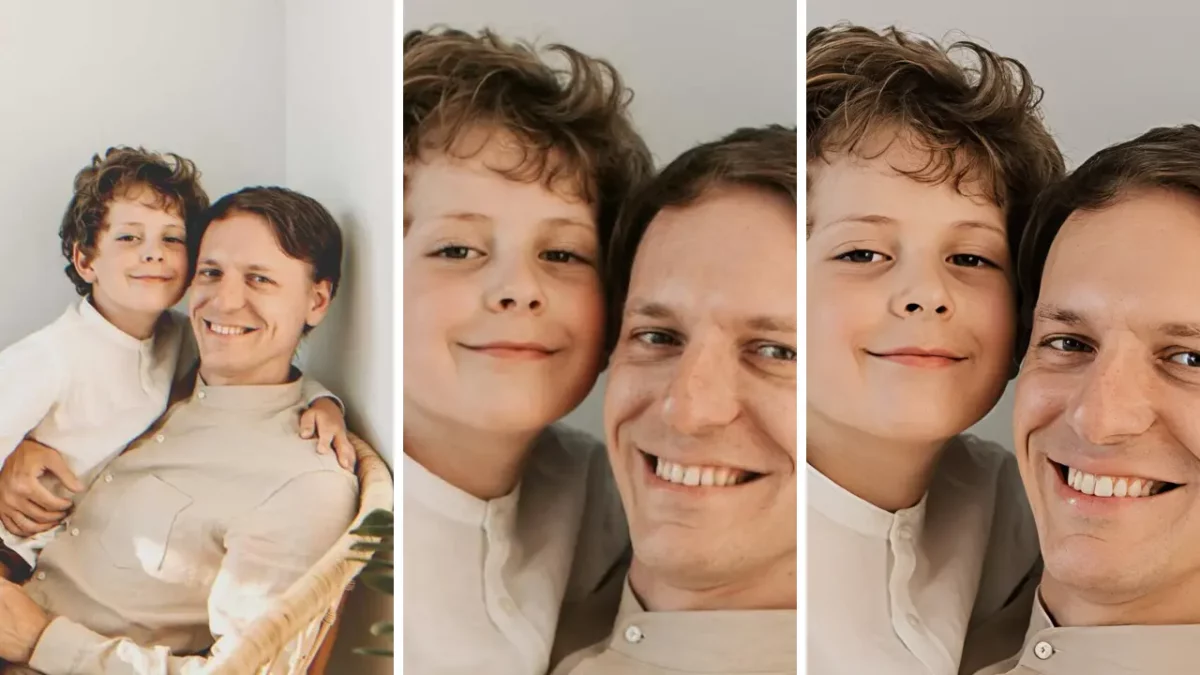
4. Introducing SuperID Enhancer and Upscaler: AI Sharpening Made Easy
While there are several AI sharpening tools available, SuperID Enhancer stands out for its user-friendly interface and powerful AI technology to understand how to sharpen a blurry image. Here’s how SuperID’s Enhancer tool simplifies the process of sharpening blurry photos:
a. Effortless Uploading:

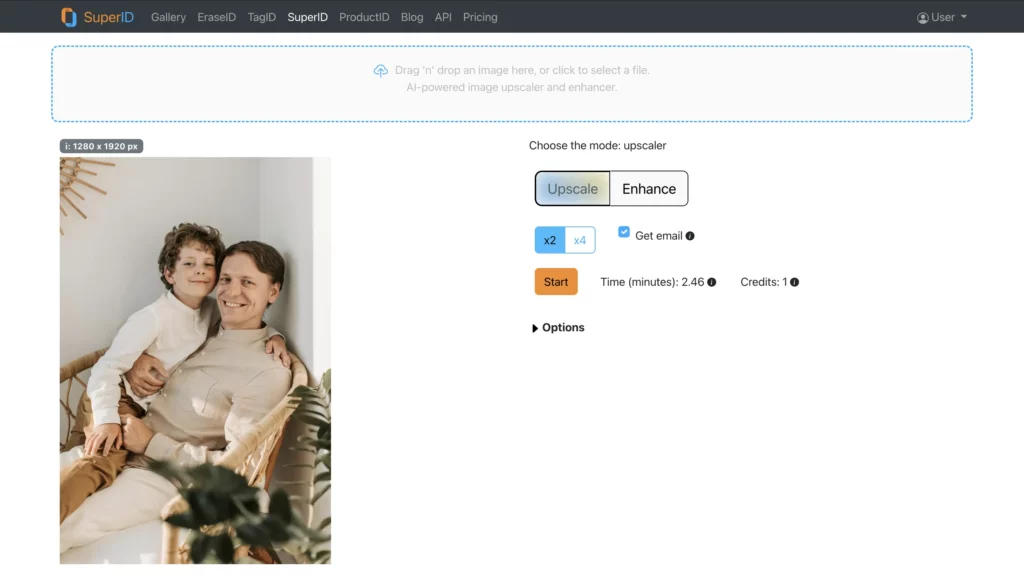
- Visit the SuperID website (https://studio.piktid.com/superID).
- Locate the upload button and select the blurry photo you want to sharpen from your computer files.
- Click “Upload” to upload the image to the SuperID platform.
b. AI-powered Sharpening:
- Once uploaded, SuperID’s advanced AI algorithms will automatically analyze your image.
- The AI will identify blurry areas and apply intelligent sharpening techniques to enhance detail and clarity.
c. Effortless Results:

- Unlike traditional methods with numerous sliders and adjustments, SuperID takes care of everything.
- The AI automatically optimizes sharpening parameters for the best possible results on your specific image.
- You can preview the sharpened image directly within the SuperID platform.
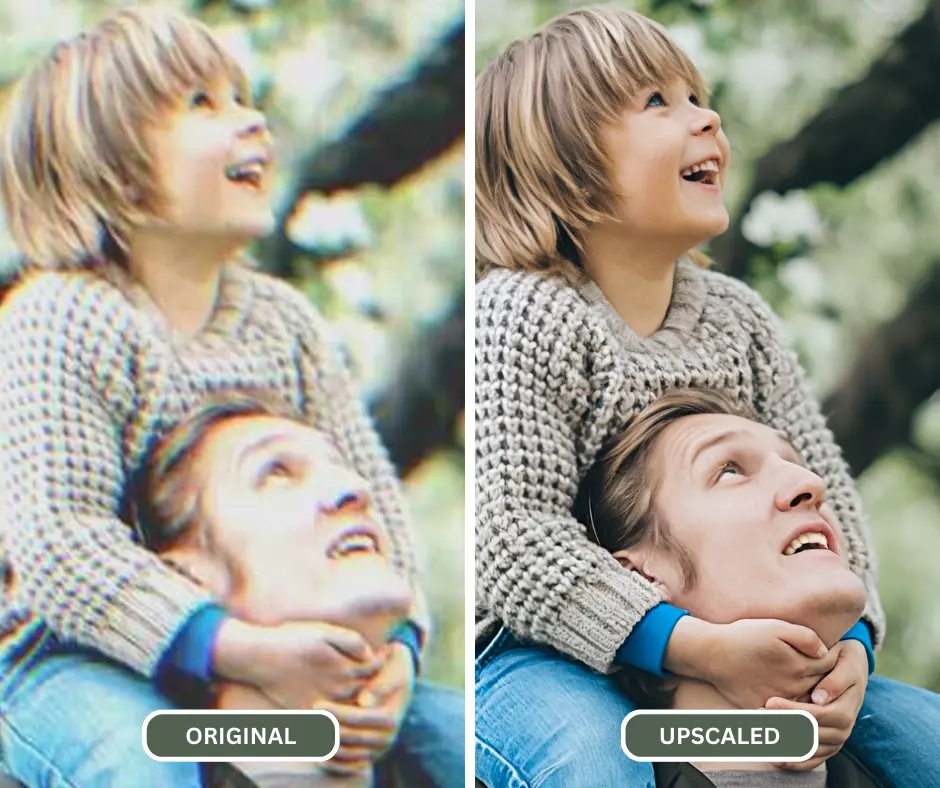
d. SuperID Upscaler:
- For heavily blurred or low-resolution images, SuperID offers an additional tool called Upscaler.
- This AI-powered feature not only sharpens the image but also increases its resolution, resulting in a more detailed and clear final product.
5. SuperID Enhancer vs Traditional Sharpening: A Clear Winner
Here’s a table summarizing the key differences between AI sharpening with SuperID Enhancer and traditional sharpening methods:
| Feature | SuperID Enhancer (AI) | Traditional Sharpening (Photoshop) |
| Process | Automatic | Manual |
| Controls | No user adjustments needed | Requires adjusting sliders and settings |
| Results | Superior detail enhancement, minimal noise | Can be time-consuming to achieve optimal results, risk of artifacts |
| Ease of Use | Effortless, one-click sharpening | Requires technical knowledge and experimentation |
| Speed | Fast processing times | Can be slow due to trial-and-error adjustments |
| Upscaling Option | SuperID Upscaler | Not available |
6. Conclusion: AI Takes the Sharpening Crown
While learning how to sharpen a blurry image the two approaches like traditional sharpening methods have their place in image editing history, AI-powered sharpening tools like SuperID Enhancer offer a clear and powerful alternative. SuperID’s AI technology delivers superior sharpening results in a fraction of the time compared to manual adjustments in software like Photoshop.
Here's a quick recap of the reasons why AI sharpening, particularly with SuperID, reigns supreme:
- Effortless sharpening: SuperID automates the entire sharpening process, eliminating the need for complex adjustments and saving you valuable time.
- Preserved details: SuperID’s AI sharpening enhances details while minimizing noise and artifacts, ensuring a natural and visually pleasing outcome.
- Faster results: Achieve stunning results in minutes with SuperID, compared to the trial-and-error approach of traditional methods.
- Upscaling capabilities: SuperID Upscaler tackles heavily blurred or low-resolution images, offering a complete restoration solution for even the most challenging photos.
Ready to breathe new life into your blurry photos? Embrace the power of AI sharpening with SuperID Enhancer. Visit the SuperID website and upload your blurry images today! Let SuperID’s AI technology transform your cherished memories into sharp, crisp visuals that truly capture the moment.